Showing posts with label DIY. Show all posts

Tuesday, December 31, 2013

Way Too Long

It's been way too long since I've posted on here. Let me recap the last few months:

- I moved to Tampa.
- I started two new jobs.
- I applied to three OT Master's programs.
- I spent my birthday at Islands of Adventure.
- I spent Thanksgiving with my family in Central Florida.
- I spent Christmas with my family in Pennsylvania.
- I will officially be an aunt to a beautiful niece in 3 weeks or less.

Quite an interesting few months! I love my job(s) and I am enjoying being back in Tampa, although I am anxiously awaiting my "fate" school-wise. I haven't decided how I want to handle this blog: will it be more of a personal blog or more of a crafts blog? I guess that's why I went with "Nic Knacks"...I suppose it could be both, right?

Since there's always a craft going on around here and I'm also incredibly excited about her arrival, I thought I'd show off my latest creation for my upcoming niece, Grace:


My mom bought this Jungle Jill crib set from Kohl's (don't you just LOVE Kohl's?) and we thought pulling out the giraffe print from it would be fun. I love how they came out and the best part is that it was SO EASY! I worked on them during episodes of Grey's Anatomy (I'm working on Season 6 and moving along quickly!). All you need is some blank canvases, your favorite fabric, a staple gun, wooden letters,Modge Podge, and some pretty paint. Honestly the whole thing couldn't have taken longer than a few hours of work and about $20 - works for me! :)

I can't believe 2013 is over. It has been quite a year for me...way more lows than highs. But I have to say, it started horrible and ended on a pretty good note. I am looking forward to seeing what - and where - 2014 brings me. Happy New Year!

Monday, June 17, 2013

Busy Bee and Disney Tee

These past few weeks have been crazy busy for me. I'm moving July 12th and the packing/organizing has begun! Why is it that you never realize how much stuff you have until it's time to move?! Ugh!

Among all the packing and organizing, I managed to put together a quick shirt for a special almost 2-year-old who will be having her birthday party this coming weekend (Happy Birthday, Isabella!).


It took me about an hour because my sewing machine decided not to cooperate with me on that particular day. I'm pretty happy with it overall considering how quickly I got through it. I started making these shirts about two months ago when I needed a quick shirt to put together for a trip to Disney with friends. They worked out great and wash really well! Below is what one of the one's I made for Disney looked like:


I decided to sew on a fabric bow instead of attach one on Isabella's shirt because I realized what a royal PAIN it is to wash a shirt with a bow. Seriously, if someone knows how to do it without the bow coming out a wrinkled mess, please share your insight!

Anyway, I believe the packing is calling. Wish me luck!

Check out my Etsy shop for custom Disney shirts like Isabella's above!
https://www.etsy.com/listing/154050408/custom-disney-minniemickey-birthday-age

Wednesday, June 12, 2013

Updating CJ's Room

Hello!

I have returned from my trip to Pennsylvania. My baby brother is now a high school graduate. Incredible! The five days I was there flew by. Aside from eating out, Six Flags, shopping, family time, and staying up way too late, we managed to get CJ's new "college" room done. He was so surprised! It was definitely a team effort and totally worth it.

I traveled up to PA with all the crafts I had put together for his room. I'll admit, I forgot to take pictures of everything. But I did get some pictures!

Painted "E S U" letters for his college. 
We put them up on the wall with command strips and they looked great!

It's amazing what you can do with a blank canvas and some paint.
Making this made me want to make more! Anyone need some letter canvases?!

Another canvas I worked on. I'm really happy how it came out.
(Although honestly, it was kind of time consuming/a pain!).

Overall I'm really happy with how everything turned out! Now I'm back in Florida and back to reality. Why do vacations always go by so fast? :( Can't wait to go back again!

Monday, May 27, 2013

Silhouette Collage

My brother just turned 18 this month and he'll be graduating high school in a week and a half (I'm still in denial). With all these changes, my mom and I decided it's probably time to re-do his room. Nothing too fancy; we're just re-arranging current furniture, buying a few new things, and changing out the decor. He'll be attending ESU for college so we thought the school colors (red and black) would be a good color scheme to work with.

Because I'm more of a crafter than a spender, I have been trying to come up with ideas of things to make for his room versus buy. I've come up with a few ideas that I'm currently in progress with and will post throughout the week. For now, my first completed project was this silhouette collage.


I think it looks great! The best part? It cost me $0!

What I did was find a free collage maker online (I used Fotor, but there are plenty of others!). I picked sports silhouettes and organized them how I wanted. I uploaded a picture of his school's logo (you can use any picture you want or even multiple pictures!). I changed the background color to red to go with the color scheme. Once I was satisfied, I saved a copy to my computer and uploaded it to Walgreens Photo online. I used Walgreens because I had a free 8x10 print, but any retailer would work (or you can print at home!). Within the hour, I picked it up from Walgreens, took it home, and put it in this old frame I already had. Voila!

Picture (created with Fotor) - $0
Printing (Walgreens coupon) - $0
Frame (already owned) - $0

That's my kind of project!

Stay tuned for more posts on other projects I am working on for my brother's room!

Wednesday, May 8, 2013

DIY Monster's Inc. Mike Wizowski Shirt

Anybody who's somebody knows that Monster's Inc. is coming out with a new movie, Monster's University, next month. I'm excited. I may be an adult but I can't help but love a good animated movie. I have a feeling this one is going to be great.

Living so close to Orlando has its perks. It means that I get to visit the local theme parks when time (and finances!) permit. Can you guess where I'll be headed for the day next week? I'll give you one hint - Mickey Mouse! As I'm sure everyone has seen around the internet, it's quite popular to make/buy themed shirts to wear when visiting the parks. I hopped on Etsy looking for a great shirt and I was shocked. $25 for a shirt?! Craziness. So I decided to make my own.

A quick Google search led me to this image and I decided to use it as my inspiration.


Now I'll be honest. I've just recently taught myself to sew so I am still a major beginner. But I decided to give this project a shot anyway. Guess what? It worked! Let me tell you how I did it.

I went on over to Hobby Lobby (love!) and bought the following supplies:
- 1 lime green t-shirt (30% off!)
- White fabric (I believe I went with 1/4 of a yard to be safe)
- 1 sheet of each: light blue, and black felt (found in the craft aisle)
- 1 package of Heat N Bond (have you tried this stuff? <3!)

I really should have taken more detailed pictures of the process but I didn't think of it.

1. First, I traced a large round bowl right onto the Heat N Bond. Make sure it's proportionate to the shirt size you are using! I cut out that circle.
2. Using an iron and following the Heat N Bond directions, I ironed the circle I created right onto the white fabric (this will create the white of Mike's eye).
3. Once bonded to the fabric, I cut it out. If you are following along, you should have a white circle of fabric with the Heat N Bond on the backside. Peel off the backing of that Heat N Bond, position it where you want the "eye" to be on the shirt. Then go ahead and iron that down.
4. Using white thread and my sewing machine, I did a quick sew around the eye. Look at the picture below for reference. If you look closely, you'll see my sewing skills weren't perfect. But hey, I'm not looking for perfection. It got the job done.


5. Next, traced a smaller bowl directly onto the blue fabric (you can use the Heat N Bond method above for this, I just got lazy and decided to just sew it directly onto the shirt). I did the same for the black iris of Mike's eye. Once I was happy with the positioning, I sewed them onto the shirt (I changed out the thread to match the blue and black felt. You don't have to, I just get a little OCD).
6. Now comes the part where you get a bit creative. Looking at the image I used for my inspiration, I free-handed a drawing of Mike's mouth. I again used the Heat N Bond method, drawing it directly onto the adhesive, cutting it out, ironing it onto the black felt, cutting it out. It's not as hard as it sounds, as the shape isn't too complicated if you look at it.
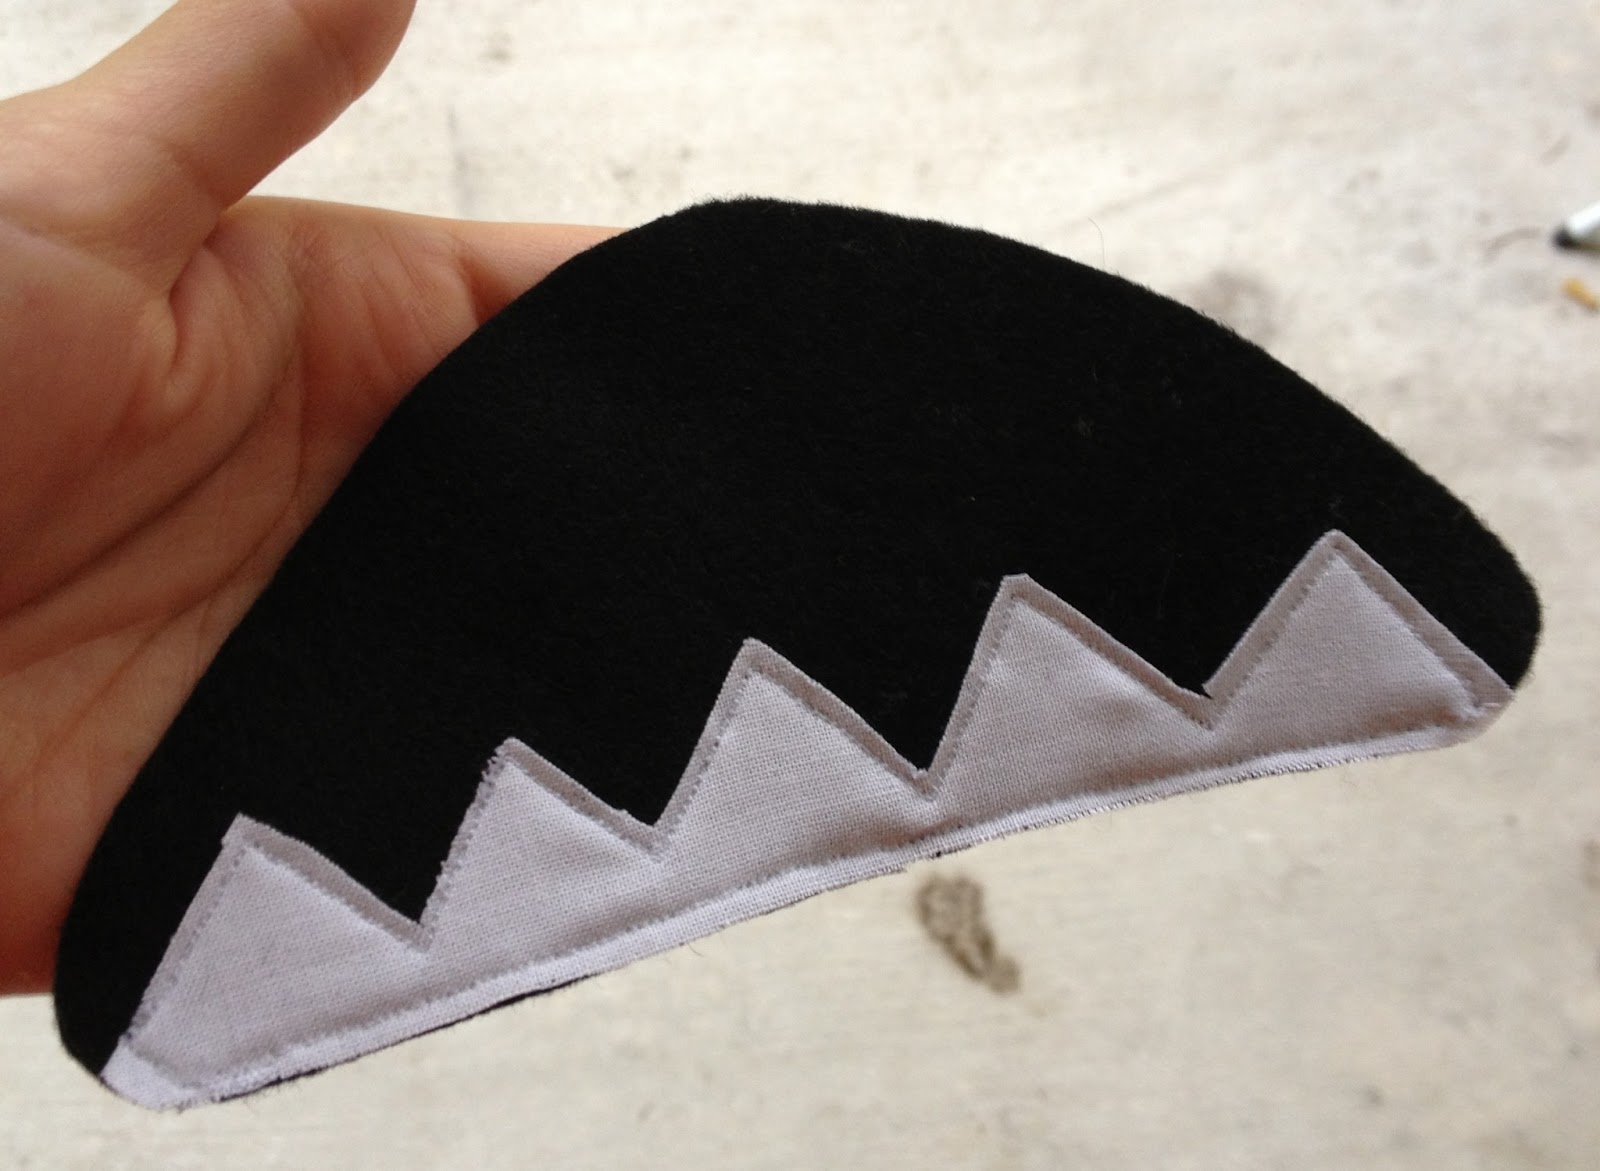
7. Once I was happy with it, I drew some teeth onto the same white fabric I used to make the eye. I cut them out and pinned the strip of teeth directly onto the black felt "mouth". Out came the sewing machine and white thread, as I sewed the two together.


Again, not perfect, but it got the job done. I'm happy with it.

8. Now all that's left to do is sew the complete mouth onto the shirt. Remember that the Heat N Bond is on the back of the mouth. Peel away the paper and  find the place on the shirt you think the mouth looks best. Then iron away. After I ironed it on, I sewed through the teeth part using white thread and the mouth part using black thread. You don't have to be as particular about that as you want. One thread color all around won't ruin the shirt.

Here is my completed shirt:


Again, not perfect, but I wasn't looking for perfection. For a beginner, I think it looks pretty good! The best part? It only cost me about $5! Much better than the pricier shirts I saw online.

If you give this project a shot, please link up to me and share your link with me! I'd love to see how yours came out! In the meantime, I'm excited to wear mine to Disney World next week!